All posts
Bridge USDC, ETH & more to Solana: 5 top options
Moving SOL to ETH or routing ADA and ALGO into Solana isn't always straightforward. We break down where each bridge shines, what they actually cost, and which one fits your route.
Bridges

Numbers
Proven performance
TL;DR
Key takeaways
Five ways to move USDC, ETH or SOL onto Solana, ranked by speed, fees and how easy they are to use
Symbiosis swaps tokens from 30+ chains straight into SOL in minutes — no extra wallets or steps
Portal (Wormhole) keeps your token type: send USDC, get USDC on Solana as a 1:1 wrapped version
Allbridge connects 20+ networks, including non-Ethereum chains, and works well for moving stablecoins
Want fiat-to-SOL fast? A centralized exchange like Binance is quickest, but you'll need to verify ID
10 minute reading
Bridges
Solana bridge methods compared side by side
Method | Type | Token Changes? | Chains Supported | Requires Solana Wallet | Speed | Best For | Ease of Use |
Symbiosis Finance | Cross-chain swap | Yes (e.g. ETH → SOL) | 30+ EVM & non-EVM | Yes | Fast (minutes) | Swapping into SOL quickly | High |
Portal (Wormhole) | Native bridge | No (e.g. USDC → USDC wrapped) | 10+ chains (via Wormhole) | Yes | Moderate (a few minutes) | Preserving token type across chains | Moderate |
Allbridge | Multi-chain bridge | No (e.g. USDT → wrapped USDT) | 20+ chains | Yes | Fast (minutes) | Moving tokens/stablecoins cross-chain | High |
Centralized Exchanges | Exchange withdrawal | Yes (via trading) | Chain support depends on exchange | Yes | Very fast | Buying SOL with fiat or crypto | Very High |
Phantom Wallet | In-wallet cross-chain swap | Yes (e.g. ETH → SOL) | Ethereum, Polygon, Base | Already built-in | Very fast | Swapping into SOL directly in-wallet | Very High |
Cross-chain swaps: Bridge to Solana with Symbiosis Finance
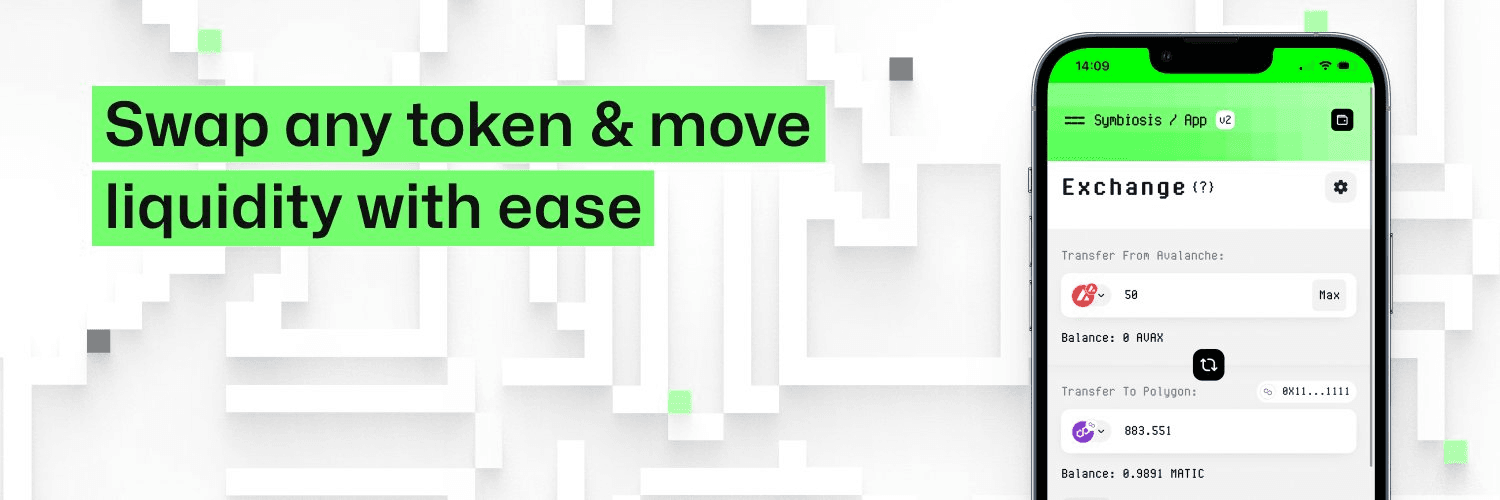
If you're looking for a quick and easy way to bridge assets to Solana, one of the best options out there right now is Symbiosis. Whether you’re moving tokens from Ethereum, BNB Chain, or another network, Symbiosis lets you swap straight into SOL – without needing multiple wallets or jumping between platforms.
Let’s break down how this works, step by step.
What is Symbiosis Finance?
Symbiosis Finance is a cross-chain DEX aggregator that makes bridging to Solana as straightforward as swapping tokens on a typical decentralized exchange. It supports a wide range of chains – both EVM and non-EVM – and handles the technical bits like routing and wrapping behind the scenes. If you’ve ever wanted a no-fuss way to do a Solana bridge, this is it.
How to bridge SOL using Symbiosis: step-by-step
Why use Symbiosis to bridge to Solana?
Head to the Symbiosis swap page
Go to app.symbiosis.finance/swap. Make sure you're on the official site.Connect your wallet
Click "Connect Wallet" and choose your preferred option – MetaMask, Trust Wallet, or another Web3 wallet. You’ll need to connect the wallet that holds the assets you’re swapping from.Pick your chains
In the interface, select the blockchain you're starting from – say Ethereum or BNB – and set Solana as the destination.Select your token
Choose the token you want to swap (like ETH or USDT), and enter how much you want to bridge.Check the details
Symbiosis will show you the expected amount of SOL you'll receive, the gas fee, and the route it’ll take. Double-check everything looks good.Click swap and approve
Hit "Swap" and approve the transaction in your wallet. Symbiosis takes care of the entire cross-chain swap, including routing, bridging, and converting the token into SOL.Wait for confirmation
The process usually takes a few minutes. Once it’s done, your SOL will appear in your connected Solana wallet – like Phantom or Solflare.
Native bridges: how to use Portal (Wormhole) to bridge to Solana
It’s beginner-friendly: No juggling multiple bridges or complex steps. Symbiosis has a clean, intuitive UI that handles everything for you.
It supports lots of chains: Whether you're coming from Polygon, Ethereum, BNB, or Avalanche, Symbiosis can help you bridge to Solana without needing a separate tool for each one.
Fast and secure: The platform uses audited smart contracts and aggregates liquidity to make sure your SOL bridging experience is fast and safe.
What is Portal Bridge?
If you're moving assets between blockchains and want the most direct route into the Solana ecosystem, Portal Bridge, powered by Wormhole, is one of the most trusted and widely used tools around. It’s what’s known as a native bridge – meaning it's built specifically to move tokens to and from Solana while maintaining their original form, just in a Solana-compatible wrapper.
For example, if you send USDC from Ethereum, you won’t be swapping it for SOL or any other token. You’ll still have USDC on Solana – just the wrapped version that works within the Solana network.
This is different from a cross-chain swap, where you’re exchanging one token for another (e.g., ETH → SOL), and different again from multi-chain bridges that support dozens of networks. Portal is all about direct, token-preserving transfers, deeply integrated with Solana and secured by Wormhole’s validator network.
How to bridge tokens to Solana using Portal
Portal works using a lock-and-mint model: when you bridge a token, it gets locked on the source chain and an equivalent wrapped token is minted on Solana. The original stays put – the wrapped version represents it 1:1 on the new network.
The process is backed by the Wormhole Guardian Network, a decentralized group of validators that watch and verify cross-chain activity. Only when they confirm a transaction does the wrapped token appear on Solana – making this system one of the more secure ways to bridge to Solana.

Why use Portal to bridge to Solana?
Visit Portal
Head to portalbridge.com and open the app.Connect your wallet
Choose your source wallet (like MetaMask if you’re on Ethereum).Set your source and destination chains
Select the chain you’re moving from and choose Solana as your destination.Pick the token and amount
Choose the asset you want to move (e.g., USDC, ETH) and how much.Connect your Solana wallet
Use a Solana-native wallet like Phantom or Solflare to receive the wrapped token.Create a token account (if prompted)
If you haven’t received that token before on Solana, you’ll be guided through creating an associated token account.Review and initiate the transfer
Double-check the details and hit "Transfer."Approve the transaction
Approve the action in your source wallet. Portal will lock your original tokens and trigger minting on Solana.Claim your wrapped tokens
Once confirmed, you’ll see your tokens in your Solana wallet, ready to use in DeFi, NFTs, or wherever you’re headed.
Token stays the same: You're not swapping, you're moving the same token across chains – ideal for stablecoins and long-term holdings.
Built for Solana: As a native bridge, Portal is optimized for performance and compatibility with Solana-based dApps.
Highly secure: Backed by the Wormhole Guardian Network, which ensures all transfers are verified before minting.
Trusted by many: Portal has seen billions in transfer volume and is a staple for serious cross-chain users.

Multi-chain bridges: how to use Allbridge to move assets to Solana
Aren’t native bridges and multi-chain bridges basically the same thing? Not quite – and the difference matters when you’re choosing how to bridge to Solana.
A native bridge, like Portal (Wormhole), is typically built to support a specific blockchain ecosystem. It locks your token on the source chain and mints a wrapped version on the destination chain. It’s a direct pipeline – and often the most deeply integrated option – but it can be limited to certain chains and tokens.
A multi-chain bridge, like Allbridge, is more like a universal adapter. It supports a wide variety of EVM and non-EVM networks (including Ethereum, BNB Chain, Polygon, and Solana) and lets you move the same token across them – often in wrapped form. It’s designed for flexibility, not just one ecosystem.
What is Allbridge?
Allbridge is a powerful multi-chain bridge designed to help you move tokens between different blockchains – including both EVM-compatible networks (like Ethereum, BNB Chain, and Polygon) and non-EVM chains like Solana.
It supports dozens of networks and a wide list of tokens. So if you're looking for a flexible and reliable Solana bridge option, this is a great place to start.
There are two flavors:
Allbridge Classic – for general token transfers.
Allbridge Core – ideal if you're specifically moving native stablecoins like USDC or USDT between chains.
Let’s walk through how to use it.

How to bridge assets to Solana using Allbridge
Why use Allbridge to bridge to Solana?
Go to the Allbridge site
Head to allbridge.io and hit "Launch App."Connect your wallet
Choose your Web3 wallet (like MetaMask if you're on Ethereum). You’ll also need to connect your Solana wallet (such as Phantom) for the receiving side.Choose your chains
Select your source chain (like Ethereum) and destination chain – in this case, Solana.Pick your token and amount
Choose the asset you want to move (say USDT) and enter the amount you’re bridging.Start the transfer
Hit “Transfer,” approve the transaction in your wallet, and let Allbridge handle the cross-chain magic.Receive your tokens on Solana
In a few minutes, you should see the same token (often as a wrapped version) show up in your Solana wallet. Done.
Centralized exchange transfers: the easy way to get SOL to Solana
Works across dozens of blockchains: Allbridge isn’t just a Solana bridge – it connects Ethereum, Avalanche, Polygon, Arbitrum, and more. If you're deep in DeFi, that flexibility matters.
Quick and efficient: Transfers usually only take a few minutes, depending on the chains involved and network congestion.
Clean interface: Allbridge makes things easy. Even if you’re not a technical user, the UI is straightforward and beginner-friendly.
Reliable and secure: The platform has undergone audits and is used widely by the community – a solid choice when you're moving serious value.
How to move SOL to your Solana wallet using Binance
Sometimes the easiest way to get your SOL onto the Solana network is by using a centralized exchange like Binance.
If you’re already trading on a platform like Binance, Coinbase or Kraken, you can skip all the multi-step DeFi stuff and just do everything in one place. Think of it as the beginner-friendly way to bridge to Solana – even though technically you’re not bridging, you’re just using the exchange’s internal systems to get your SOL where it needs to go.
Here’s how it works.
Why this method works
Log into Binance
First, sign in to your Binance account. If you don’t have one, you’ll need to create it and go through the usual KYC process.Deposit or Buy Some Crypto
If you already have something like ETH or USDT in your account, great. Otherwise, you can fund it with a card or bank transfer.Trade for SOL
Use the Binance spot market to swap whatever you’ve got into SOL. Easy.Head to Withdrawals
Go to “Wallet” → “Fiat and Spot” → and then hit “Withdraw.” Select SOL from the list.Send to Your Solana Wallet
Paste in your Solana wallet address – like from Phantom or Solflare.
Double-check that you’re selecting the Solana network (not ERC-20 or BSC – this is important).
Enter the amount of SOL you want to send and review the fee (usually super low).
Confirm and Done
Complete the security checks, submit the withdrawal, and you’re all set. Your SOL should show up in your Solana wallet within a couple of minutes.
It’s familiar: If you’ve used a centralized exchange before, this will feel second nature.
You don’t need to think about bridges or chains: The platform handles everything for you under the hood.
It’s fast: Transfers from Binance to Solana usually take just a couple of minutes.

Wallet-based solutions: bridge to Solana inside Phantom Wallet
If you're already using Phantom Wallet, here's some good news: you don’t need to leave the app to bridge to Solana anymore. With Phantom’s built-in Cross-Chain Swapper, you can move tokens from other blockchains – like Ethereum, Polygon, or even Base – straight into SOL, all without opening a single extra tab.
This is probably the most seamless option out there, especially if you're not into juggling third-party platforms or dealing with multiple wallets.

How it works: cross-chain swaps in Phantom
Why use Phantom to bridge to Solana?
Here’s the process in plain English:
Open your Phantom Wallet
Just launch the app on your browser or mobile – no extra downloads or sites needed.Go to the swap tab
Inside Phantom, tap the “Swap” section. It’s where you’d usually do token swaps on Solana, but now it handles cross-chain swaps too.Pick the token you want to bridge
Let’s say you’ve got ETH on Ethereum – choose it as your source. Then select SOL as your target.Review the details
Phantom will show you everything: how much SOL you’ll get, the gas fee, and how long it’ll take.Confirm and swap
Hit confirm, approve the transaction in your wallet, and Phantom takes care of the rest – including the bridging.Receive your SOL
Once it’s done, you’ll see the SOL show up in your wallet, ready to use in the Solana ecosystem.
Which Solana bridge should you use?
It’s ridiculously convenient: You don’t have to visit any external sites. Just swap and go.
It’s all-in-one: Phantom handles the cross-chain bridge in the background, routes everything for the best deal, and shows you real-time status.
It supports major chains: Right now, you can swap from Ethereum, Polygon, and Base – and likely more to come.
Perfect for Solana users: If you’re already living in Phantom for DeFi or NFTs, this is the smoothest way to bring assets into the Solana network.


Lead Growth Product Manager
FAQs
Got questions?
Still have questions? Contact us and we’ll help you out.
01
How do I bridge SOL to ETH?
You can reverse most Solana bridges by selecting Solana as the source and Ethereum as the destination. With Wormhole Portal, Allbridge Core, or deBridge, connect a Solana wallet like Phantom and an EVM wallet like MetaMask, then confirm the Solana transfer first. Costs in reverse are broadly similar, though you'll pay Ethereum gas on the receiving end.
02
How do I bridge USDC from ETH to Solana?
Head to a bridge like Portal (portalbridge.com), connect your Ethereum wallet (MetaMask) and Solana wallet (Phantom), then select USDC with Ethereum as the source and Solana as the destination. Confirm the approval and transfer in your wallet, and after a few minutes your USDC appears on Solana. Symbiosis is another option if you'd rather swap straight into SOL in one step.
03
How do I use Allbridge Core to bridge USDT from TRON to Solana?
Go to allbridge.io and launch the app, then connect your source wallet and your Solana wallet like Phantom. Select your source chain, Solana as the destination, choose USDT, and enter your amount. Allbridge Core is built for native stablecoin transfers, so hit Transfer, approve, and your USDT lands on Solana in a few minutes. Check that your source chain is supported in the app before starting.
04
What is Allbridge's minimum transfer amount from Polygon to Solana?
Allbridge doesn't publish a single fixed minimum — practical limits depend on the token, pool liquidity, and network fees on each side. The key consideration is that very small transfers can be eaten up by gas and bridge fees, so it's worth checking the quoted output in the app before confirming. For Polygon to Solana, fees are generally low compared to Ethereum mainnet routes.
05
What's the difference between native USDC and wrapped USDC on Solana?
Native USDC on Solana is issued directly by Circle and is redeemable 1:1 for dollars through their ecosystem. Bridges using Circle's CCTP preserve this by burning and minting native tokens on each side. Older lock-and-mint bridges instead create a wrapped USDC backed by collateral on the source chain, which can have thinner liquidity and isn't directly redeemable with Circle.
06
Is it cheaper to send Solana or USDC?
On the Solana network itself, transfers are extremely cheap either way — typically a fraction of a cent per transaction. USDC on Solana is well supported and inexpensive to move, making it practical for stablecoin transfers. The bigger cost difference comes from which source chain you bridge from, not the asset itself.
07
Can I avoid high Ethereum gas by bridging to Solana from an L2 instead?
Yes — bridges like Across and Wormhole support routes from Arbitrum, Optimism, Base, and BNB Chain directly to Solana. You pay the cheaper L2 or alternative-chain gas plus the bridge fee instead of expensive Ethereum mainnet gas. For small transfers of a few hundred dollars, swapping to USDC on a cheaper chain first often saves significant cost.
08
Do I need both an EVM and a Solana wallet to bridge to Solana?
Yes, you'll need an EVM wallet like MetaMask or Rabby for the source chain and a Solana wallet like Phantom, Backpack, or Solflare to receive funds. Make sure you paste a Solana base58 address, not an Ethereum one, into the bridge UI. If you're receiving a token for the first time, you may also be prompted to create an associated token account on Solana.
Learn more
Bridge guide
Best Ethereum to Solana bridge: fees & speed compared
Moving assets between Ethereum and Solana shouldn't mean guessing which route is cheapest. We break down how Allbridge and other options stack up, so you can pick the right one in 2026.
Read article

Best BNB Chain bridges: fast cross-chain BEP20 swaps
Moving ETH to BNB or bridging ADA and ALGO into BEP20? We break down five bridges by speed, fees, and supported chains so you can pick the right one before your next swap.
Read article
How to bridge BNB to Solana: fees & speed compared
Moving assets between two of crypto's busiest chains shouldn't cost you a fortune or an hour of waiting. We break down the solana-bnb bridge routes that actually save you money, plus which ones to skip.
Read article
Swap crypto across 50+ networks
Non-custodial. No KYC. Connect your wallet and get started.
